Use Cases & Workflows
Real-world scenarios and step-by-step solutions for common tasks.
Quick Barcode Generation
Scenario: You need a barcode quickly, no setup required.
Steps:
- Open SweepTag to Home screen (or skip setup wizard)
- Go to Codes tab
- Tap Create, then choose Standalone code
- Pick what the code should hold: Wi-Fi, Link, or Text
- Fill in the fields for that kind (Wi-Fi network + password, a URL, or free text) — a live preview of the QR code appears in the sheet as you type
- Tap Save code
The code's name is filled in automatically (the Wi-Fi network name, the link, or the first line of text). Standalone codes are always QR codes — if you need a Code 128 barcode with your own name and value, add the item as an asset in a collection instead.
Then:
- Print: Tap print icon → Select printer (label size and content come from Settings › Printing)
- Share: Tap share icon → sends the code's encoded value as text
- Done: No collection setup needed!
Time: 1 minute
Print Barcode Labels and Share
Scenario: Generate barcodes and print them on labels.
Steps:
- Set up your label once in Settings › Printing:
- Label size: Small (efficient), Medium (standard), or Large (easy scan)
- What's printed: toggle Asset name, Barcode value, Collection / site, Field values, and Print date
- Generate or select a barcode (see above)
- Tap print icon 🖨️
- Select printer and copies (AirPrint or network)
- Tap "Print"
- Labels print to thermal label printer or paper
Pro tips:
- Use 4" × 6" thermal labels for best results
- Medium size is standard for most assets
- Barcode + Name is most useful for identification
Sharing printed barcode:
- Take a photo of the printed label
- Send via email/messaging
Sharing digital barcode:
- After generating, tap share icon 📤 — this shares the barcode's encoded value as text (not an image)
- To send a scannable image instead, tap Print and share the label PDF from the print dialog, or use the file export described in Keep a Shared Drive of Barcode Files Up to Date
Time: 2-3 minutes
Create a Personal Tool Library Inventory
Scenario: You have 100+ tools and want to track them.
Steps:
Part 1: Create Collection
- Open SweepTag → Go to the Assets tab
- Tap New collection (also available under Settings › Data › New collection)
- Name it: "My Tools" or "Workshop Inventory", and pick the "Tools & machines" template on the same step
- Tap Continue, review the fields, then tap Save collection
Part 2: Add Your Tools
Option A: Manual entry
- Go to Assets tab → Select your collection
- Tap "+" button to add each tool:
- Asset type: "Power tool"
- Name: "Power Drill"
- Location: "Garage"
- Condition: "Good"
- Purchase price: "$120"
- Repeat for all tools (or do in batches)
Option B: Import from spreadsheet
- Prepare a CSV file:
Name,Category,Location,Condition,Value Power Drill,Power Tools,Garage,Excellent,$120 Hand Saw,Hand Tools,Shed,Good,$35 Ladder,Large Items,Garage,Fair,$75 - Go to Settings › Data and tap your collection
- Choose Import CSV / JSON and select your file
- SweepTag imports all tools at once
Part 3: Generate Barcodes
- Go to Assets tab → Select your collection
- Tap Select, then Select all (or tick specific tools)
- Tap Barcodes in the action bar at the top of the list
- Tap "Generate" to confirm — tools that already have a barcode are skipped (the dialog shows the counts)
- Barcodes generate in one go
Part 4: Print Labels
- Choose a label size in Settings › Printing (Small for efficiency)
- Go to Codes tab → Files view and open your collection's folder — the Select toolbar appears wherever files are listed
- Tap Select, then Select all (or tick specific files)
- Tap "Print"
- Print to label sheets
Part 5: Attach and Use
- Cut labels from printed sheets
- Attach to each tool
- Now you can scan tools for checkout/return tracking
Timeline: 3-4 hours (includes data entry)
Next steps: Use Scan barcodes for tracking to log check-outs
Barcode Lansweeper Assets
Scenario: You need to barcode your entire IT infrastructure via Lansweeper.
Steps:
Part 1: Connect Lansweeper
- In your browser, go to app.lansweeper.com → click your name initials (top right) → Account settings → Developer Tools → Add New API Client
- Choose Personal Access Token (PAT) as the authentication method and copy the token (Lansweeper shows it only once)
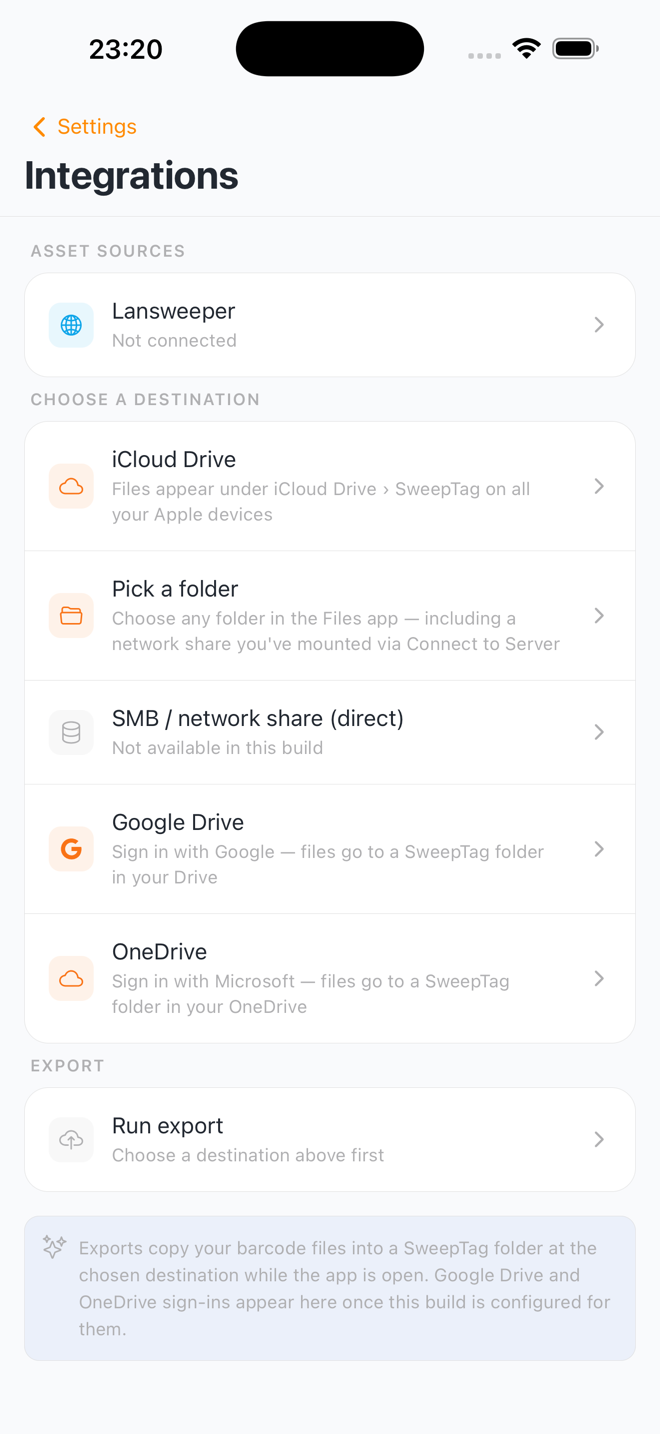
- In SweepTag, go to Settings › Integrations › Lansweeper
- Tap Add connection — the setup wizard walks you through the same PAT steps in-app
- Name the connection and paste your PAT
- Tap Continue
SweepTag auto-discovers your sites — pick the ones you want, and the wizard finishes by letting you choose a barcode field
Part 2: View Your Assets
- Go to Assets tab → Select "Lansweeper"
- Select a site from your authorized sites
- Browse all assets or search for specific ones
- Tap an asset to see full details (30+ data points)
Part 3: Generate Barcodes
For a site's assets:
- Go to Assets tab → Select Lansweeper › your site
- Tap "Select" and tick the assets you want
- Tap "Generate N barcodes"
- All barcodes generate (progress is shown; can take a while for 1000+ assets)
For specific assets:
- Go to Assets tab → Select Lansweeper › your site
- Search to narrow the list
- Tap "Select" and tick the matching assets
- Tap "Generate N barcodes"
Part 4: Configure Barcode Encoding
Before generating, customize how barcodes encode:
- Go to Settings › Integrations › Lansweeper and find Barcodes link to
- Choose:
- App link (a SweepTag deep link that opens the asset in the app)
- Lansweeper web (direct link to the asset in Lansweeper)
- Custom URL (your own system, e.g.,
https://inventory.company.com/asset/{assetKey}—{assetKey}is replaced with the asset's key; without it,?assetKey=…is appended)
Your choice applies immediately — there's no separate save step.
Part 5: Print Labels
- Choose a label size in Settings › Printing (Medium is standard)
- Go to Codes tab → Files view and open your site — barcodes are organized into folders by asset type
- Open a type folder (e.g., Servers) — the Select toolbar appears where files are listed
- Tap Select, then Select all and Print; repeat per type folder (or use search to select across folders)
- To print a whole site in one go, switch the Codes tab to the List view instead, where Select all spans everything
- Print to your label printer
Part 6: Distribute Labels
- Attach barcode labels to physical assets
- Employees can now scan to see asset details instantly
- Barcodes link to Lansweeper for IT staff
Timeline: 1 hour setup + 2-3 hours printing & labeling
Scan Barcodes for Asset Tracking
Scenario: You generate barcodes and want to scan them to track assets.
Steps:
Part 1: Generate Barcodes (if not done yet)
See Create a Personal Tool Library Inventory or Barcode Lansweeper Assets
Part 2: Scan a Barcode
- Go to Scan tab in SweepTag
- The camera opens automatically (grant camera access on first use)
- Point at any barcode (QR code, Code 128, etc.)
- App automatically:
- Detects the barcode
- Decodes it
- Logs the scan with timestamp
- Shows asset details (if in your collection)
Part 3: Interpret Scan Results
The app shows:
- Asset name (if barcode is linked to your system)
- Barcode value (what was encoded)
- Timestamp (when scanned)
- Scan type (Asset, URL, Contact, Location, etc.)
Part 4: Log Asset Interactions
For tool library:
- Scan when tool is checked out
- Scan when tool is returned
- Use scan history to track availability
For IT audits:
- Scan to verify asset is physically present
- Scan to check location matches records
- Flag discrepancies for investigation
Part 5: View Scan History
- Go to Home tab
- The "Scans this week" chart at the top shows your scan activity for the last 7 days
- Below it, the "Recent scans" section lists your 5 most recent scans
- Tap any recent scan to open the full Scan History list, then tap a record there to see its details
Or tap See all next to Recent scans (also reachable via Settings › Scan History) to search and filter older scans
Timeline: 10 seconds per scan
Export Barcode Data for Reports
Scenario: You need to generate reports or backup your barcode data.
Steps:
Export Barcodes as Files
Barcode files aren't exported from the Codes tab — the Codes tab's select mode offers Print and Delete. Instead, SweepTag writes barcode files (PNG, JPEG, SVG, or PDF, configured per source) to a folder or cloud drive:
- Set the file format and naming per source in each collection's File structure section (Settings › Barcode › the collection), or under Settings › Integrations › Lansweeper › File structure for Lansweeper sites
- Go to Settings › Integrations, choose a destination, then tap Run export → Export now
See Keep a Shared Drive of Barcode Files Up to Date below for the full walkthrough. For a one-off label, Print a barcode and share the PDF from the print dialog.
Export Asset Data as CSV
- Go to Settings › Data
- Tap your collection
- Choose Export CSV (or Export JSON)
- The share sheet opens with the CSV/JSON as text — send it to an app, or use Save to Files (or paste it into a note) to keep it as a file
Then:
- Open in Excel or Google Sheets
- Analyze, calculate, or format as needed
- Use for reports, audits, or sharing
Export Scan History
- Go to Home tab → Recent scans → See all (or Settings › Scan History)
- Tap the share icon in the header
- In the Export scan history prompt, choose Export CSV or Export JSON
- The share sheet opens — send the export to any app, or save it as a file
The CSV has one row per scan with these columns: Scanned at (ISO timestamp), Value, Name, Type, Classification, Confidence, Linked asset, Site, Batch, and Duplicate.
Use for:
- Audit reports
- Compliance documentation
- Team sharing
- Data analysis
Timeline: 1-2 minutes per export
Keep a Shared Drive of Barcode Files Up to Date
Scenario: You want the current barcode images and label PDFs to always be available on a network share or cloud drive — for a print station, a facilities team, or another system that reads files from a folder.
Steps:
- Go to Settings › Integrations and look under Choose a destination
- Choose a destination:
- SMB / network share (direct) — connect straight to a NAS or Windows share; SweepTag speaks SMB 2/3 itself, no Files-app mount needed
- Pick a folder — any folder from the system picker, including a share you've already mounted
- iCloud Drive — reachable on all your Apple devices
- OneDrive or Google Drive — sign in with Microsoft/Google; files land in a
SweepTagfolder in your account
- Tap Run export, then Export now — SweepTag writes everything into a managed
SweepTag/subfolder, organized like the Codes › Files view - Re-run it whenever your assets change — only the new or changed files are written
Good to know:
- It's a one-way mirror (app → destination), not a two-way sync. SweepTag only touches files it created and never overwrites files it didn't.
- One device owns a folder. To feed one shared drive from several devices, give each device its own subfolder or destination.
- Exports run while the app is open — there's no background upload.
- If a run fails, enable Debug mode (Settings › Advanced) and read the activity log; it names the exact cause.
Use for:
- A print station that always pulls the latest labels
- Handing barcode files to a team that doesn't use SweepTag
- An off-device backup of every generated code
Timeline: Under a minute per export after the first full run
Set Up Multiple Teams/Collections
Scenario: Multiple teams need separate inventories (IT, Facilities, Warehouse).
Steps:
Part 1: Create Multiple Local Collections
Create each collection from Assets tab › New collection (or Settings › Data › New collection):
- For IT: template "IT equipment" › Name: "IT Inventory"
- For Facilities: template "Facilities" › Name: "Facilities Inventory"
- For Warehouse: template "Blank" › Name: "Warehouse Items"
Part 2: Populate Each Collection
- Assign team members to populate their respective collection
- Each team adds its own assets, custom fields, etc.
Part 3: Generate Barcodes
- Each team generates barcodes for its collection
- Organize by collection (different folder structures per team)
- Print team-specific batches
Part 4: Coordinate Scanning
- Each team scans its own assets
- Scan history is a single device-wide list — scans of a collection's assets open that collection's asset details, but there's no per-collection scan history or per-team scan report
- Data exports (CSV/JSON) are per collection, so each team still gets its own asset report
Benefit: Multiple teams, one app, completely isolated data
Timeline: Depends on number of teams and assets
Migrate from Spreadsheet to SweepTag
Scenario: You have assets in Excel and want to use SweepTag.
Steps:
Part 1: Prepare Your Data
- Open your Excel file
- Ensure columns match SweepTag field names:
- Required:
Name(asset name) - Optional:
Serial Number,Location,Owner, etc.
- Required:
- Save as CSV (File › Save As › CSV format)
Part 2: Import as a New Collection (fastest)
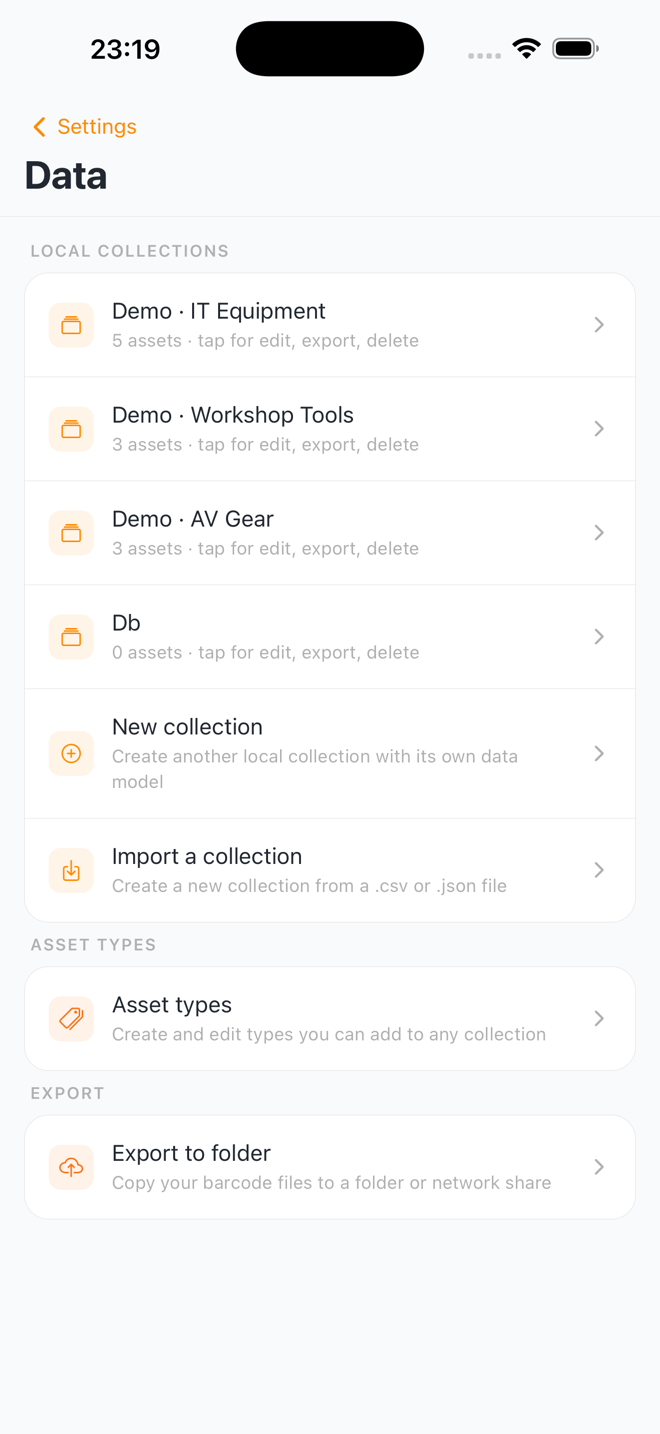
- In SweepTag, go to Settings › Data
- Tap Import a collection
- Select your CSV file
- SweepTag creates the collection with a field for every column (the first column becomes the asset name)
Part 3: Or Import into a Prepared Collection
Use this route when you want typed fields (dates, choices, checkboxes) instead of plain text:
- Create the collection first (Assets tab › New collection) — choose an appropriate template (or Blank) and add custom fields for your Excel columns
- Go to Settings › Data, tap the collection, and choose Import CSV / JSON
- Select your CSV file — SweepTag maps columns to your fields by name
All assets imported!
Part 4: Generate Barcodes
- Go to Assets tab → open the collection
- Tap Select, then Select all
- Tap Barcodes in the action bar, then Generate to confirm
Part 5: Verify Data
- Browse a few assets in Assets tab
- Check that data imported correctly
- Make any corrections needed
Timeline: 30 minutes (including data prep)
Audit Assets Using Barcodes
Scenario: You need to verify that physical assets match your records.
Steps:
Part 1: Prepare
- Ensure all assets have barcodes (or generate them) — in a collection's asset list, tap the filter button next to the search box and set the Filter & sort sheet's barcode filter to No barcode to find any assets without one
- Attach labels to physical assets
- Bring mobile device with SweepTag
Part 2: Perform Audit
- Start at first location (e.g., Building A)
- Open Scan tab in SweepTag
- For each asset in the location:
- Scan its barcode
- Verify asset details match what you see
- Note discrepancies (wrong location, missing, damaged, etc.)
- Continue through all locations
Part 3: Log Discrepancies
During audit, make notes:
- "Asset A should be in Room 2, but found in Room 3"
- "Asset B label is missing"
- "Asset C is damaged"
Part 4: Generate Report
- After audit, go to Home tab → Recent scans → See all
- Review the scan history (shows what was scanned)
- Tap the share icon in the header → Export CSV (see Export Scan History)
- Combine with your notes
Report shows:
- All scanned assets (verified present)
- Scan times
- Any missing assets (not scanned)
- Discrepancies noted during audit
Timeline: Depends on asset count (1-2 hours for ~100 assets)
Create Barcode for Equipment Rental
Scenario: You're renting equipment and need to track rentals.
Steps:
Part 1: Create Collection
- Assets tab › New collection › template "Blank" › Name: "Equipment Rental"
- Create fields:
- Equipment name
- Equipment type
- Rental rate
- Renter name
- Rental start date
- Rental end date
Part 2: Add Equipment
- For each item you rent:
- Name: "Projector #1"
- Type: "AV Equipment"
- Rate: "$50/day"
- Location: "Equipment Storage"
Part 3: Generate Barcodes
- Go to Assets tab → open the collection
- Tap Select, then Select all, then Barcodes → Generate
Part 4: Track Rentals
- When equipment is rented:
- Scan barcode
- Update "Renter Name" and "Start Date"
- When returned:
- Scan barcode
- Update "End Date"
- Note condition
Part 5: Generate Invoice
- Export asset data as CSV
- Use in spreadsheet to calculate rental fees
- Send invoice to renter
Timeline: Depends on number of rentals
Common Troubleshooting Scenarios
See FAQ for detailed troubleshooting.
Next Steps
- Want more detail on a feature? Check Feature Guides
- Need to configure something? See Configuration Reference
- Have a question? Try FAQ
- Interested in what's coming? See Limitations & Roadmap