Feature Guides
Detailed step-by-step walkthroughs for every major feature in SweepTag.
Table of Contents
- Local Collections
- Adding Assets
- Filtering & Sorting Assets
- Importing Assets from a File
- Custom Fields
- Barcode Generation
- Standalone Codes (Wi-Fi, Links & Text)
- Barcode Scanning
- Printing Labels
- File Organization
- Exporting to a Folder or Cloud
- Lansweeper Integration
- Multi-Collection Management
- Exporting Data
Local Collections
Creating a Local Collection
A local collection is your own inventory system. Use it for tools, equipment, personal items, or small business assets.
Where to start: the collection wizard opens from any of these places:
- First launch: the setup wizard offers it automatically (tapping Create on Home also routes here while you have no collection yet)
- Assets tab → New collection
- Settings tab → Data → New collection
Steps:
- Name your collection (e.g., "Lab Equipment" or "Company Tools")
- On the same step, under Start from a template, choose a starter kit (or start blank). Each kit bundles shared fields plus ready-made asset types:
- IT equipment: Computers, monitors, phones, printers, network devices — serials, purchase info, who has what
- Tools & machines: Power tools, hand tools, machines, safety equipment — condition, location, service dates
- AV gear: Cameras, audio, lighting, grip — kit tracking with check-out info
- Furniture & office: Desks, seating, storage, office appliances — rooms, purchase info, condition
- Facilities: Heating & cooling, fire safety, keys — inspections and service contacts
- Blank: Just a name field (you'll add your own fields and types)
- Tap "Continue"
- Review or adjust the fields (and asset types) the kit set up
- Tap "Save collection"
Your collection is ready! You can now add assets (see Adding Assets).
Tip: For the full field list of each kit — and everything about types — see Asset Types.
Managing Multiple Collections
Once you have multiple collections, you can switch between them easily.
To switch collections:
- Go to Assets tab
- Tap a collection's chip in the row at the top (All shows everything)
- The list now shows only that collection's assets
To delete a collection:
- Go to Settings tab → Data
- Under Local collections, tap the collection
- Tap "Delete collection"
- Confirm (this cannot be undone)
To rename a collection:
- Go to Settings tab → Data
- Under Local collections, tap the collection
- Tap "Edit data model"
- Change the name
- Tap "Save collection"
Note: Each collection is completely independent. Barcodes generated for one collection won't appear in another.
Adding Assets
Add a Single Asset
Steps:
- Go to Assets tab
- Select your collection (if multiple exist)
- Tap the "+" button at the top right
- Choose the asset type (e.g., Computer, Monitor) — skipped automatically if your collection has only one type (see Asset Types)
- Fill in the fields:
- Name (required): Asset name (e.g., "ThinkPad X1")
- Shared fields: The same for every asset (serial number, location, etc.)
- Type fields: The chosen type's own section (e.g., Operating system for a Computer)
- Use dropdown fields: Tap to select from predefined options
- Use date fields: Type the date in any common order — SweepTag understands it and shows it in your chosen date format (see Formats)
- Tap "Create asset"
Your asset is created! It appears in the asset list.
Bulk Add Assets (Import)
Already have your assets in a spreadsheet or another tool? Import them from a CSV or JSON file instead of typing them in one by one — see Importing Assets from a File.
Edit an Asset
Steps:
- Go to Assets tab → Select collection
- Tap the asset you want to edit
- Tap the pencil icon (top right)
- Modify any fields
- Tap "Save changes"
Delete an Asset
Steps:
- Go to Assets tab → Select collection
- Swipe left on the asset, then tap "Delete" — or open the asset and tap "Delete" on its detail screen
- Confirm
Note: Long-pressing an asset opens a quick read-only preview (Dismiss / Open asset), not a delete menu. The swipe-left action is configurable in Settings › Appearance › Asset swipe actions (see Swipe Actions) — it defaults to Delete.
Bulk Edit Assets
Edit multiple assets at once.
Steps:
- Go to Assets tab → Select collection
- Tap "Select" button (top right)
- Tap to select multiple assets (checkboxes appear), or use Select all
- An action bar appears at the top of the list with three actions: Bulk edit, Barcodes (see Generate Barcodes for Multiple Assets), and Delete
- Tap "Bulk edit"
- Turn on each field you want to overwrite and enter its new value (e.g., "Location" → "Warehouse B"); fields left off keep their current values
- Tap "Apply to N assets"
All selected assets are updated with the new values.
Note: Fields marked unique identifier (the name field is unique by default) can't be bulk edited — the same value can't go to several assets. They appear grayed out with the note "(this needs to be unique and can not be bulk edited)".
Filtering & Sorting Assets
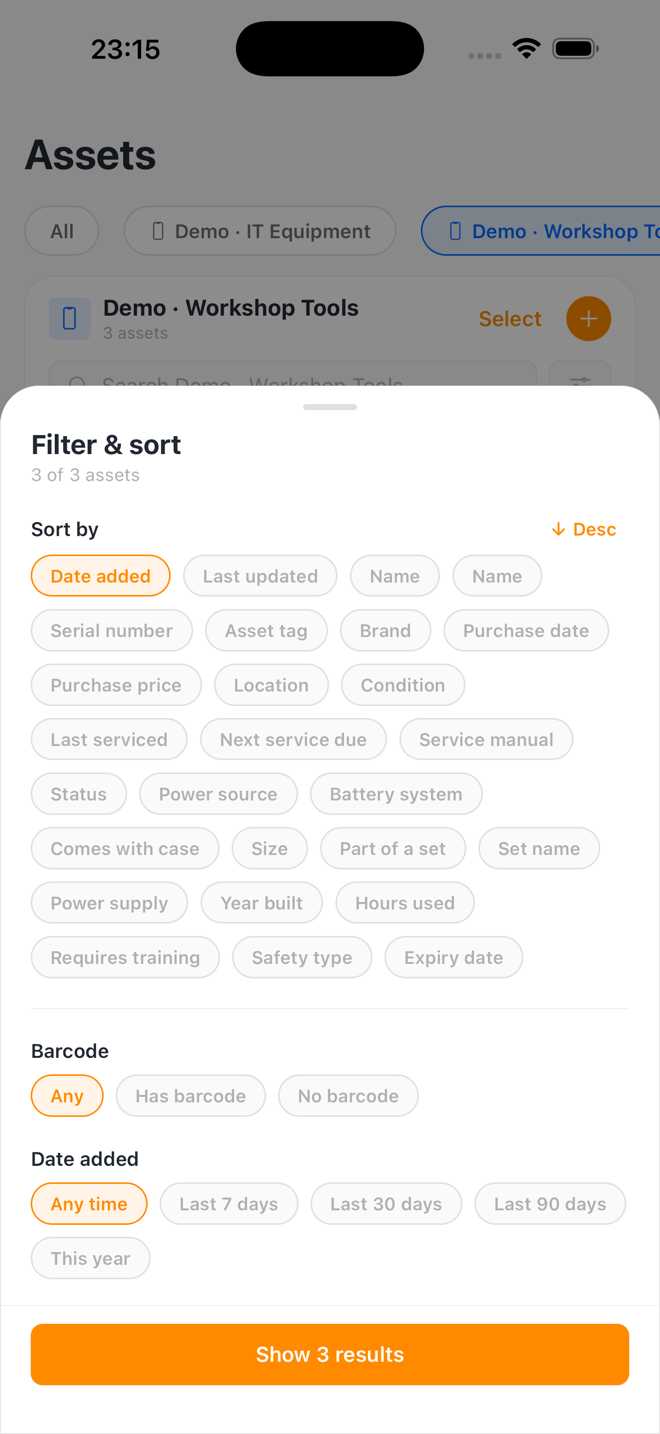
Every collection's asset list has a search box — and next to it a filter button (sliders icon) that opens the Filter & sort sheet. Use it to slice a big collection by any field, or to change the list order.
Open the Filter & Sort Sheet
Steps:
- Go to Assets tab → Select your collection
- Tap the filter button (sliders icon) next to the search box
- The Filter & sort sheet opens, showing how many assets currently match
Everything in the sheet applies live — the count updates as you toggle, and the button at the bottom always reads Show N results. Tap it to return to the list.
Sorting
Under Sort by, pick Date added, Last updated, Name, or any of your own fields (multiline text fields can't be sorted on). Tap the Asc / Desc arrow next to the heading to flip the direction.
Built-in Filters
| Filter | Options |
|---|---|
| Barcode | Any / Has barcode / No barcode |
| Date added | Any time / Last 7 days / Last 30 days / Last 90 days / This year |
| Data quality | Missing a unique ID — finds assets that leave a unique-identifier field empty (the name field is unique by default; mark others, like serial numbers, in Custom Fields) |
Per-Field Filters
Below the built-ins, the sheet generates a control for every filterable field in your collection (grouped fields are labelled "Group · Field"):
- Choice fields: one chip per option — select several to match any of them
- Checkbox fields: Any / Yes / No
- Number fields: a Min–Max range — purchase-price fields show your default currency symbol
- Date fields: the same presets as Date added — except a field used as Warranty expiry, which gets Expired, Expiring ≤30d, Expiring ≤90d, and Active instead
Clearing Filters
- The filter button shows a badge with the number of active filters, so you always know when the list is narrowed.
- Tap Clear all at the top of the sheet to remove every filter at once (your sort choice is kept).
Importing Assets from a File
Bring existing data into SweepTag from a CSV or JSON file — either into a collection you already have, or as a brand-new collection built from the file.
Import into an Existing Collection
Steps:
- Go to Settings tab → Data
- Under Local collections, tap the collection you want to import into
- Tap "Import CSV / JSON"
- Pick your file
- SweepTag adds the assets and confirms with "Import complete" — including how many were added, and how many rows (if any) had nothing to import and were skipped
Import as a New Collection
Steps:
- Go to Settings tab → Data
- Tap "Import a collection"
- Pick your
.csvor.jsonfile - SweepTag creates a new collection from the file:
- CSV: every column becomes a text field (the first column is used as the name)
- JSON exported by SweepTag: the full data model is restored — fields, groups, and asset types included
How Columns Are Matched
- Columns are matched to fields by their display name — a
Serial numbercolumn fills your "Serial number" field. Grouped fields also match their qualified name (e.g.Warranty / Expiry date), and a field's "Used as" label works too. - A Type column assigns each row's asset type (matched by type name); a Barcode column sets the asset's barcode value.
- Files exported by SweepTag (Settings › Data → tap a collection → Export CSV / Export JSON) re-import cleanly, so export/import also works as a backup-and-restore or copy-between-devices flow.
Custom Fields
What are Custom Fields?
Custom fields let you store any data you want about your assets. SweepTag supports 9 field types:
| Field Type | Purpose | Example |
|---|---|---|
| Text | Short text (single line) | "Serial number", "Model" |
| Notes | Long text (multiple lines) | "Notes", "Description" |
| Number | Numeric values | "Purchase price", "Quantity" |
| Date | Calendar dates | "Purchase date", "Warranty expiration" |
| Choice list | Dropdown options | "Status" (New/Used/Damaged), "Department" (HR/IT/Finance) |
| Link | Web links | "Product page", "Manual link" |
| Email addresses | "Owner email", "Support email" | |
| Phone | Phone numbers | "Vendor support", "Asset owner phone" |
| Checkbox | True/False toggle | "Under warranty?", "Recently serviced?" |
Adding Custom Fields to a Collection
Steps:
- Go to Settings tab → Data
- Under Local collections, tap the collection → "Edit data model"
- Scroll to the "Fields every asset has" section
- Tap Field (the add-field button)
- Enter the field name (e.g., "Serial Number")
- Choose the field type (e.g., Text)
- If Choice field: Add your options (e.g., "New", "Used", "Damaged")
- Tap "Save field", then "Save collection"
Your field is added! It now appears when you create or edit assets.
Note: Fields added here are shared fields — every asset in the collection gets them. To add fields that only appear for one kind of asset (e.g., only computers), add them to an asset type instead. The optional "Used as" row in the field editor tells SweepTag what a field is used as (serial number, warranty expiry, …) to power cross-type reports and duplicate warnings. See Asset Types.
Unique identifiers: tick Unique identifier in the field editor for values that must never repeat (serial numbers, asset tags, …). SweepTag then refuses to save an asset whose value duplicates another asset's, and the filter sheet can find assets that are still missing a unique ID.
Reordering: drag a field by its handle to change its position in the list — forms and detail views follow the same order. Dragging also moves a field into or out of a group. This works the same way inside an asset type's own field list (the types themselves reorder with the up/down arrows).
Organizing Fields with Groups
Group related fields together for better organization (e.g., all warranty fields together).
Steps:
- In Edit data model → Fields every asset has
- Tap Group (next to the add-field button)
- Enter group name (e.g., "Warranty Information")
- Add fields to the group — tap Add field to "…" inside the group, or drag existing fields in
- Fields in a group appear together when editing assets
Barcode Generation
Generate a Barcode for a Single Asset
Steps:
- Go to Assets tab → Tap your asset
- Tap "Generate barcode" — the barcode is created instantly, using the collection's barcode setup, and appears on the asset detail
There is no per-barcode options screen: format and link type are set per collection. To change them, tap Barcode setup next to the barcode (or go to Settings › Barcode and tap the collection under Collection configurations). There you choose:
- Format: QR Code or Code 128
- Links to: App link (opens the asset in SweepTag when scanned) or Custom URL (your own URL, with an optional asset-key field and, for QR codes, extra embedded fields)
Save with Save barcode setup — assets keep their existing barcode values until you regenerate them.
From the asset detail, you can:
- Print: Tap Print barcode to print a label
- Share: Tap Share to send the asset's field values (and barcode value) as text
- Copy: The barcode value below the code is selectable — long-press it to copy the text
Generate Barcodes for Multiple Assets
From the asset list:
- Go to Assets tab → Select collection
- Tap "Select", then select the assets (or use Select all)
- In the action bar at the top of the list, tap "Barcodes"
- Confirm — the dialog shows how many barcodes will be generated; assets that already have a barcode are skipped (the count is shown)
- If every selected asset already has a barcode, SweepTag offers to Regenerate them instead
In the Codes tab: the Codes tab lists barcodes that already exist — bulk generation happens from the asset list (above). Once generated, the new barcodes appear in the Codes tab's List and Files views.
You can now:
- Print them all at once
- Organize them by folder (see File Organization)
- Export to files
QR Code vs Code 128: Which to Use?
QR Code:
- ✅ Encodes URLs and full asset data
- ✅ Scannable with any smartphone camera
- ✅ Larger but encodes more information
- ✅ Great for linking to external systems
- Best for: Customer-facing assets, quick linking, modern workflows
Code 128:
- ✅ Compact barcode format
- ✅ Scannable with dedicated barcode scanners
- ✅ Better for high-volume scanning (warehouses, retail)
- ✅ Narrower format fits small labels
- Best for: High-volume scanning, thermal label printing
Configuring Default Barcode Options
Set defaults so you don't have to choose every time.
Steps:
- Go to Settings tab → Barcode
- Choose your default format (QR Code or Code 128)
- Under Default links to, choose App link or Custom URL
- Under Default file structure, choose the File format (PNG, JPEG, SVG, or PDF)
- Every choice applies immediately
Every future barcode uses these defaults (a collection can override them — tap it under Collection configurations).
Standalone Codes (Wi-Fi, Links & Text)
Not every QR code needs to be tied to an asset. SweepTag can generate standalone codes — a guest Wi-Fi card, a link, or a snippet of text — that live in the Codes tab under a My codes group.
Create a Standalone Code
Steps:
- Open the Codes tab and tap Create (top-right).
- Choose Standalone code (the other option, Asset, adds an item to a collection).
- Pick a type:
- Wi-Fi — enter the network name (SSID), security (WPA/WPA2/WPA3, WEP, or none), password, and whether the network is hidden.
- Link — any URL.
- Text — any plain text.
- Watch the live preview update as you type, then tap Save code.
Your code appears in My codes in both the list and file views, and in the Recent barcodes widget on Home.
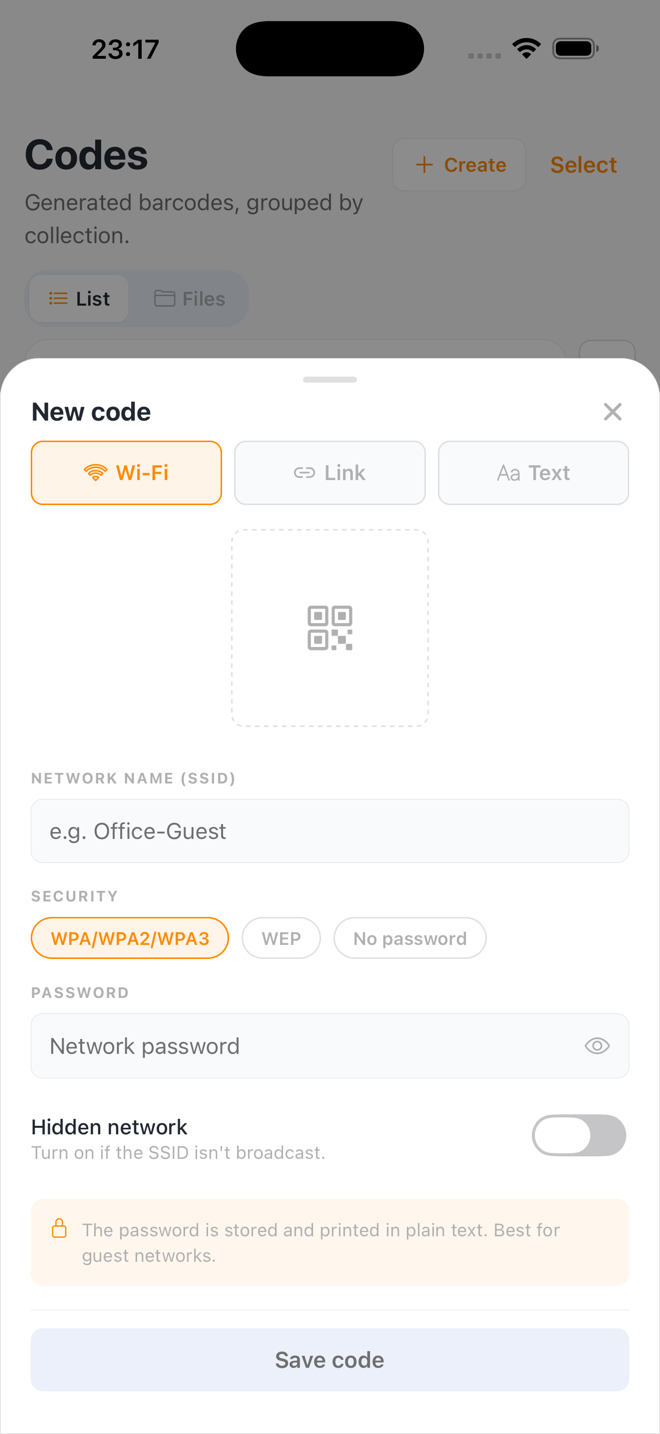
Wi-Fi tip: scan a saved Wi-Fi code with your phone's camera app and it offers a one-tap "Join network." The password is stored and printed in plain text, so Wi-Fi codes are best for guest networks.
Print or Share a Standalone Code
Tap a code in My codes to preview it, then Print or Share — exactly like an asset barcode. You can also multi-select several codes (list or file view) and print them together.
Edit or Delete a Standalone Code
The preview of a standalone code also has Edit and Delete buttons:
- Edit opens the same sheet you created the code with, pre-filled. Change any field (e.g. a new Wi-Fi password) and tap Save changes — the QR code is regenerated from the new values, so reprint the label afterwards.
- Delete removes the code after a confirmation. This can't be undone.
Wi-Fi as an Asset Type
If you'd rather track your networks as inventory, add the built-in Wi-Fi network asset type to a collection (see Asset Types). Each such asset's barcode is automatically a Wi-Fi join code built from its SSID / Password / Security fields — while every other asset in the same collection keeps its normal asset-link barcode.
Barcode Scanning
Scan Your First Barcode
Steps:
- Go to Scan tab — the camera opens automatically (grant camera access with Allow camera access the first time)
- Point at any barcode (QR code, Code 128, etc.)
- App automatically detects and decodes the barcode
- Barcode data appears:
- What was scanned (asset name, URL, phone number, etc.)
- Timestamp of scan
- Scan classification (Asset, URL, Contact, etc.)
From the scan result, you can:
- View full asset details — a SweepTag asset barcode opens the asset directly
- Copy or Share the scanned value
- Open in browser (if it's a URL)
- Scan again or tap Done
Every scan is also logged — see View Scan History below.
View Scan History
Track all your scans over time.
Steps:
- Go to Home tab
- Scroll to the "Recent scans" section
- See your 5 most recent scans with:
- Asset name or description
- Date and time
- Scan type (Asset, URL, Contact, etc.)
Tap a scan (or See all) to open the full scan history.
Search Scan History
Find a specific scan.
Steps:
- Go to Home tab → Recent scans → tap See all (or go to Settings tab → Scan History)
- Type in the search box at the top of the Scan History screen
- Matching scans appear — you can also narrow by classification, date, or batch with the filter button
Tip: like most screens, Scan History has a circled ? in the header that opens the matching knowledge-base article.
Activity Chart
Visualize your scanning activity.
Steps:
- Go to Home tab
- The "Scans this week" chart is the first widget, right at the top
- See bar graph of scans per day (last 7 days) — the count above each bar shows that day's total
- Tap See all to open the full scan history
Use cases:
- Audit verification: "Did we scan all assets in Building A on Monday?"
- Workload tracking: "How many items did I scan this week?"
Printing Labels
Print a Barcode Label
Steps:
- Generate a barcode (see Barcode Generation)
- On the asset (or code preview), tap Print barcode / Print
- The label is built from your print settings — size (Small 48×30mm, Medium 70×45mm, or Large 100×60mm) and what's on the label are set under Settings › Printing (see Print Settings)
- The system print dialog opens: choose your printer (AirPrint or network printer), copies, paper size, etc.
- Tap "Print"
Your label prints!
Print Multiple Labels at Once
Steps:
- Go to Codes tab → tap Select, then select the barcodes
- Tap "Print" in the action bar
- All selected barcodes print with your print settings (see below)
- Cut and apply to assets
Print Settings
Configure default print preferences.
Steps:
- Go to Settings tab → Printing
- Choose your default Label size (Small, Medium, or Large)
- Toggle what gets printed on every label: Asset name, Barcode value, Collection / site, Field values, and Print date
- Every choice applies immediately
These defaults apply to every label you print or share.
Label Size Reference
| Size | Dimensions | Use Case |
|---|---|---|
| Small | 48 × 30 mm (2" × 1.2") | Small items, efficient use of label sheets |
| Medium | 70 × 45 mm (2.8" × 1.8") | Standard assets (laptops, monitors) |
| Large | 100 × 60 mm (3.9" × 2.4") | Large items, easy scanning in warehouses |
Printing Requirements
- Printer: AirPrint-compatible (iOS) or network printer (Android)
- Labels: Thermal label rolls (4" × 6" recommended) or label sheet paper
- Quality: 203+ DPI for best barcode readability
- Connectivity: Printer must be on same Wi-Fi network
File Organization
What is the File View?
The File View organizes all your barcodes into a virtual folder structure (like a file system). This helps you find and manage barcodes by category.
Example structure:
Codes/
  My codes/                    ← standalone Wi-Fi / link / text codes
    Office-Guest.png
  Local Collection (My Tools)/
    Hand Tools/
      hammer.png
      saw.png
    Power Tools/
      drill.png
      sander.png
  Lansweeper (Office Site)/
    Servers/
      server-01.png
      server-02.png
    Workstations/
      workstation-01.png
View File Organization
Steps:
- Go to Codes tab
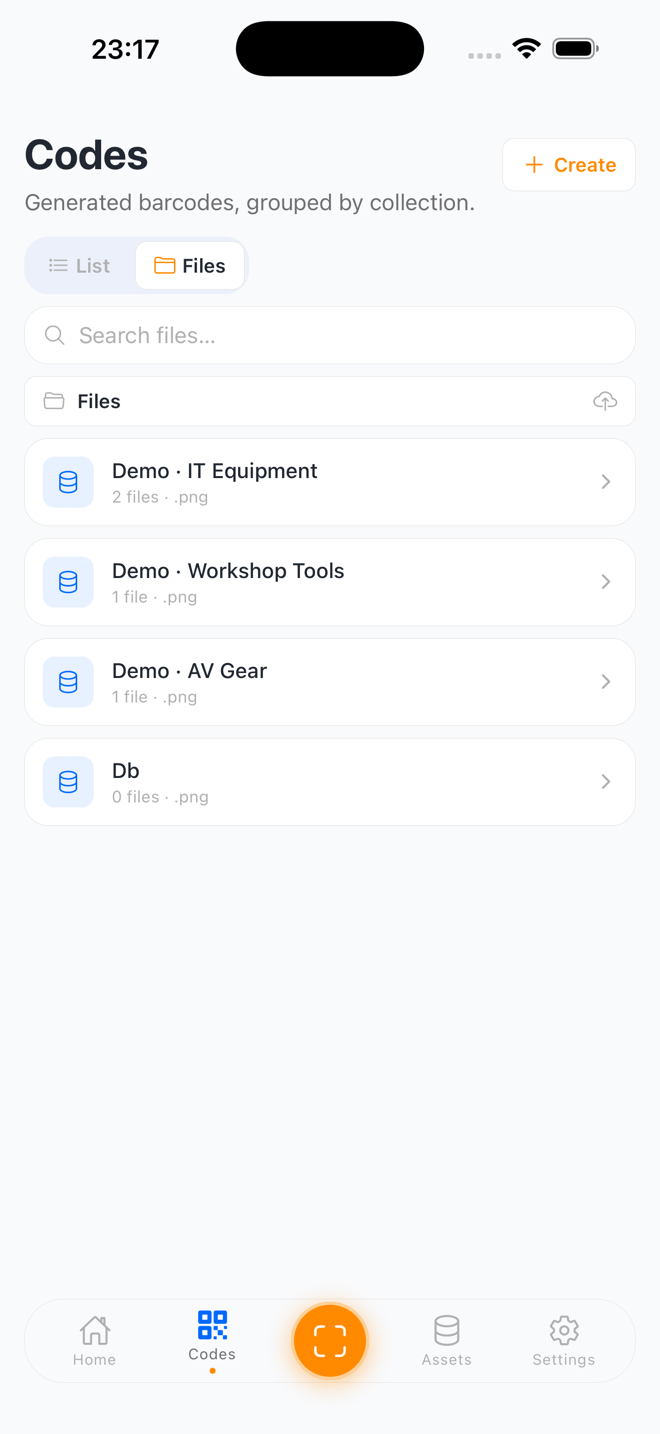
- Switch view: use the List / Files tabs near the top to move between the flat list and the folder view
- All barcodes now appear organized by collection and grouping, each with a preview thumbnail of the actual code
Preview, Print & Manage Files
- Tap any file for a preview that resembles the printable label — the barcode, asset name, and any label fields — with Print / Share and Open asset.
- Tap Select to enter multi-select, then Print or Delete several files at once (same as the list view).
- Deleting a file removes that code (a local asset's barcode is unlinked; the asset itself is kept).
Configure File Organization
Control how barcodes are grouped and named.
Steps:
- Go to Settings tab → Barcode. Defaults for every collection live under Default file structure; to set folders and naming for one collection, tap it under Collection configurations to open its Barcode setup
- Configure:
- Folders: Flat (no folders), by Format (QR/Code 128), By field (e.g., a location or status field), or by Asset type
- Name from: pick the fields that make up each file name, in order. Only fields marked required or unique identifier can be used for naming (plus the Asset id and Collection specials), so file names stay present and identifying
- File format: PNG, JPEG, SVG, or PDF
- Choices under Default file structure apply immediately; a collection's own setup is saved with Save barcode setup
All barcodes automatically reorganize using your new structure.
How names resolve: an asset that leaves one of the chosen fields empty simply skips that part. If a file would be left with no name at all, SweepTag falls back to the first field that has a value, and then to the asset's id — a file always has a name. With no fields selected, the picker shows "No fields selected — a default name is used."
Search Across All Barcodes
Find a barcode quickly.
Steps:
- Go to Codes tab (any view mode)
- Type in the search box at the top ("Search by name, value, collection…")
- Matching barcodes appear instantly
Exporting to a Folder or Cloud
Copy your barcode files — organized exactly like the Files view — to a destination outside the app: device storage, an SD card, a network (SMB) share, iCloud Drive, OneDrive, or Google Drive.
Set Up a Destination
All destinations are configured in Settings › Integrations, under Choose a destination:
- SMB / network share (direct): connect straight to a NAS or Windows/Samba server — enter the server address, share name and account, then tap Test & save, which proves the connection and the folder before saving. SMB 2/3; the password is kept in the device keychain. See Integrations › Network share (SMB).
- iCloud Drive (iPhone/iPad): one tap; files appear under iCloud Drive › SweepTag on all your Apple devices.
- Pick a folder (iPhone/iPad): pick any folder from the Files app. For SMB via Files, first add the server in Files via Connect to Server (
smb://…), then pick a folder on it. - Pick a folder (Android): pick any folder — local storage, SD card, or an SMB share exposed by a files app (e.g. CIFS Documents Provider).
- Google Drive: tap Sign in with Google; files go to a
SweepTagfolder in your Drive. - OneDrive: tap Sign in with Microsoft; files go to a
SweepTagfolder in your OneDrive.
The cloud destinations (Google Drive, OneDrive, iCloud) work in the installed app, not the web preview. Google Drive and OneDrive are the newest destinations — if you want the most proven option, a folder or iCloud is it.
The chosen destination shows as Active. To export, tap Run export in the Export section below the destinations (the same screen is also reachable via Settings › Data › Export to folder).
Export
Tap Export now. SweepTag writes everything into a SweepTag/ subfolder at your destination:
<your folder>/
  SweepTag/
    My codes/           ← standalone Wi-Fi / link / text codes
    <Collection name>/  ← one folder per collection, grouped per your file settings
    <Lansweeper site>/
How it behaves:
- Only changed files are written. Re-exporting after nothing changed does nothing; renaming assets or changing file settings moves the files accordingly.
- Deletions follow the app. Removing an asset's barcode removes its exported file — but SweepTag only ever touches files it created. Anything else in the folder is left alone.
- Formats: SVG and PDF export exactly as configured. JPEG exports as PNG, and "full label" content exports as PDF (noted in the export report).
- Exports run while the app is open — there is no background upload.
Good to Know
- One destination per device: the first device to export claims the folder with a hidden
SweepTag/.sweeptag-export.jsonmarker. If another device has already claimed it, the export stops and tells you — delete that marker file in the folder to hand it over. - Removing the destination never deletes exported files.
- If an export fails, enable Debug mode (Settings › Advanced) and open the activity log — it names the exact cause. See FAQ › An export failed.
Lansweeper Integration
Connect Your Lansweeper Instance
Prerequisites:
- Lansweeper account with at least one site
- Lansweeper API access (not available on free tier)
- Personal Access Token (PAT) from Lansweeper
Steps:
- In SweepTag, go to Settings tab → Integrations › Lansweeper
- Tap "Add connection" — a setup wizard opens
- Follow the in-app instructions to create a token: in Lansweeper (app.lansweeper.com), open Account settings → Developer Tools → add a new API client and copy the Personal Access Token (Lansweeper shows it only once)
- In the wizard, name the connection and paste your token, then tap "Continue"
- Select the sites you want to use, and (optionally) the custom field for barcode values
SweepTag auto-discovers all sites authorized by your PAT — no API URL needed.
You're connected! You can now browse and barcode your Lansweeper assets.
Browse Lansweeper Assets
Steps:
- Go to Assets tab
- Tap the site's chip in the collection row at the top (each Lansweeper site is its own chip, alongside your local collections)
- Browse all assets or use search to find specific ones
- Tap an asset to see full details (10+ sections):
- Overview (name, type, OS, owner)
- Hardware info
- Network info
- Software inventory
- Security (CVEs, vulnerabilities)
- Lifecycle (warranty, purchase date)
- And more...
Search Lansweeper Assets
Find specific assets quickly.
Steps:
- Go to Assets tab → Select the Lansweeper site
- Type in the search box at the top ("Search by name, IP, MAC…")
- Matching assets appear instantly (live search)
Generate Barcode for Lansweeper Asset
Steps:
- Open an asset detail (see above)
- Tap "Generate" (or "Regenerate" if a barcode already exists)
- The barcode is created instantly using your Lansweeper barcode defaults (format and link type — see Configure Lansweeper Barcode Defaults)
The barcode appears on the asset detail (print or share from here).
Create Custom Field in Lansweeper
Some Lansweeper fields are read-only on cloud assets. SweepTag lets you create custom text fields to store barcode values.
Steps:
- In SweepTag, go to Settings › Integrations › Lansweeper
- Tap "Create custom field"
- Name it (e.g., "Barcode ID")
- Pick one or more sites, then create — SweepTag creates the field in the sites you selected (each site shows Created, Already exists, or Failed)
- Field now appears in Lansweeper as a writable custom field
Tip: When generating barcodes, configure them to write back to this field for automatic tracking in Lansweeper.
Configure Lansweeper Barcode Defaults
Set up how all Lansweeper barcodes encode.
Steps:
- Go to Settings › Integrations › Lansweeper
- Choose the barcode format (QR Code or Code 128)
- Choose what barcodes link to: App link (opens the asset in SweepTag), Lansweeper web (opens the asset in Lansweeper), or Custom URL
- If Custom URL: enter your pattern — use
{assetKey}where the asset's key should go (e.g.,https://yourcompany.com/assets/{assetKey}) - Every choice applies immediately — there is no Save button
All Lansweeper barcodes use these defaults.
Sync Asset Data from Lansweeper
Update your local cache of Lansweeper assets.
Steps:
- Go to Assets tab → Select the Lansweeper site
- Pull down on the asset list to refresh
- SweepTag fetches the latest assets from Lansweeper
Tip: Cached data also refreshes automatically once it's older than your Refresh after interval (see Cache Management).
Multi-Collection Management
Add Multiple Local Collections
You can create many local collections for different purposes.
Steps:
- Go to Assets tab and tap "New collection" (or Settings › Data › New collection)
- Follow the same process as before (name + template, Continue, Save collection)
- Repeat for each collection you need
Switching collections: Go to Assets tab and tap the collection's chip at the top of the list.
Add Multiple Lansweeper Connections
Connect to multiple Lansweeper instances or use different PAT tokens.
Steps:
- Go to Settings › Integrations › Lansweeper
- Tap "Add connection" (also works when one already exists)
- Name the new connection and paste its PAT, then tap "Continue"
You can now have:
- Multiple Lansweeper instances (e.g., prod + staging)
- Different PAT scopes (e.g., regional accounts)
- Multiple sites from different PATs
View All Collections at Once (Home)
Get an overview of all your collections.
Steps:
-
Go to Home tab
-
See the "Assets & barcodes" widget (just below the Scans this week chart) showing:
- Total assets
- Total barcoded assets
- Breakdown per collection
-
Tap any collection to jump to it
Organize and Switch Between Collections
Quick switch in Assets tab:
- Tap a collection's chip in the row at the top
- Tap All to see everything again
Delete a collection:
- Go to Settings tab → Data
- Tap the collection
- Tap "Delete collection" and confirm
Exporting Data
Export Barcodes as Files
Barcode files aren't exported from the Codes tab — they're written to a destination you set up once (a folder, network share, or cloud drive), organized exactly like the Files view. See Exporting to a Folder or Cloud.
In short:
- Choose each source's file format (PNG, JPEG, SVG, or PDF) and folder structure under Settings › Barcode (see Configure File Organization)
- Set up a destination under Settings › Integrations
- Tap Run export → Export now — every barcode file is written to the destination
Export Asset Data as CSV
Export a collection's assets as a spreadsheet (CSV) or a full backup (JSON).
Steps:
- Go to Settings tab → Data
- Under Local collections, tap the collection
- Tap "Export CSV" or "Export JSON"
- The share sheet opens with the CSV/JSON as text (not a file attachment) — send it to Notes or Mail, or use Save to Files. To re-import a JSON later, save it as a
.jsonfile first
You can now:
- Open the CSV in Excel or Google Sheets
- Share with team members
- Back up your data — a JSON export carries the full data model and can be re-imported later, even as a new collection on another device
Export Scan History
Export all your scans for reporting.
Steps:
- Go to Home tab → Recent scans → See all (or Settings tab → Scan History)
- Tap the orange share icon in the header
- In the "Export scan history" popup, tap Export CSV or Export JSON
- The share sheet opens — save or send the export
The CSV has one row per scan with these columns: Scanned at (ISO date), Value, Name, Type, Classification, Confidence, Linked asset, Site, Batch, and Duplicate.
Use for:
- Audit reports
- Compliance documentation
- Sharing with team
- Data analysis
Share Barcode Files
Sharing a barcode sends its encoded value as text (an asset's Share button also includes the asset's field values) — it does not attach the barcode image.
Steps:
- Open a barcode (from an asset, or a code in the Codes tab)
- Tap Share
- Pick any app from the share sheet (email, messages, notes, …) — the barcode's value is shared as text
Need the barcode as an image or file instead?
- Print the label and use the print dialog's option to save/share it as a PDF
- Or use the folder/cloud export, which writes real image files (PNG, JPEG, SVG, or PDF) — see Exporting to a Folder or Cloud
Advanced Features
Deep Linking (Scan to Asset)
When you scan a barcode generated by SweepTag, the app automatically opens the asset detail.
Example:
- You scan a barcode (a QR code linking to
sweeptag://local-asset?inventoryId=…&assetId=…, orsweeptag://asset?siteId=…&assetKey=…for a Lansweeper asset) - SweepTag automatically opens and displays that asset
- Shows full details: name, fields, etc.
Offline Mode
SweepTag works fully offline. Local changes are stored on your device — there's no cloud sync, so nothing needs to catch up when you reconnect. A Lansweeper write-back that fails because you were offline is not queued: re-run it manually once you're back online (Regenerate the barcode, or sync from Lansweeper).
What works offline:
- ✅ Scanning barcodes
- ✅ Viewing cached asset data
- ✅ Generating new barcodes
- ✅ Printing labels
- ✅ Editing local assets
What requires internet:
- ❌ Browsing fresh Lansweeper data
- ❌ Creating Lansweeper custom fields
- ❌ Writing back to Lansweeper
Tip: Before visiting a site with no internet, open Lansweeper to cache the data.
Cache Management
Control how long Lansweeper asset data stays cached before it's refreshed.
Steps:
- Go to Settings › Integrations › Lansweeper (the section appears once a connection exists)
- Under Asset cache, tap a "Refresh after" interval: 1, 6, 12, 24 (default), or 72 hours
- Your choice applies immediately — no Save button
There is no separate "clear cache" control: cached lists are re-fetched automatically once they're older than the interval (or on pull-to-refresh), and removing a Lansweeper connection offers a Delete local data option that wipes its cached assets.
Theme & Appearance
Customize the app look. Everything lives under Settings › Appearance, and every choice applies immediately:
- Theme: Light, Dark, or System (follow your device setting).
- Asset swipe actions: what swiping left/right on an asset does — see Swipe Actions below.
How dates and prices are displayed moved to its own screen — see Formats.
Formats
Choose how values are displayed throughout the app. Both options live under Settings › Formats, and every choice applies immediately:
- Date format: how dates are shown throughout the app — ISO (2024-11-30), Day/Month/Year, Month/Day/Year, or Long (30 Nov 2024). Dates you type into a date field are understood in any common order (your chosen format settles ambiguous ones like 03/04) and stored safely — switching the format later just changes how existing dates are displayed.
- Default currency: the currency for purchase-price fields — 12 to choose from (Euro, US Dollar, British Pound, Swiss Franc, Japanese Yen, Canadian Dollar, Australian Dollar, Swedish Krona, Norwegian Krone, Danish Krone, Polish Złoty, Indian Rupee). Prices then display with the symbol, e.g. €1,000. Each price field on the asset form also gets its own small currency chip, so a single asset can use a different currency than the default.
Swipe Actions
Configure what happens when you swipe left/right on an asset.
Steps:
- Go to Settings › Appearance → Asset swipe actions
- Choose actions for Swipe left and Swipe right
- Options: Delete, Edit, Barcode, or None
- Your choice applies immediately
Sample Data
Want to explore SweepTag with realistic content before building your own collections?
Steps:
- Go to Settings › Advanced → Demo data
- Tap "Add sample data" — SweepTag adds five ready-made demo collections (IT Equipment, Workshop Tools, AV Gear, Furniture & Office, Facilities) filled with example assets
- Open the Assets tab to browse them — they're normal collections, so you can try barcodes, filters, exports, everything
- Done exploring? Tap "Remove sample data" — every "Demo ·" collection and its assets are deleted; your own collections are untouched
Reset the App
Erase everything and start over from the setup wizard.
Steps:
- Go to Settings › Advanced › Reset
- Tap "Reset app"
- Read the warning, tap Continue
- Type
deleteto confirm, then tap Reset app - The app returns to the Welcome screen, ready to set up fresh
This permanently deletes every collection, asset, barcode, scan, and setting on the device. Export anything you want to keep first. Full details: Data, Privacy & Reset.
Troubleshooting
Barcode won't generate?
- Ensure the asset has a name (required field)
- Check that you have free storage space on device
Printer not found?
- Ensure printer is on same Wi-Fi network
- Try restarting printer
- Use AirPrint on iOS, network printer on Android
Lansweeper connection fails?
- Verify PAT is still valid (may have expired)
- Check internet connection
- Ensure Lansweeper instance is accessible
Scans not logging?
- Verify Scan tab has camera permission
- Check that you're pointing at a readable barcode
- Try with a different barcode or QR code
See FAQ for more troubleshooting.