Configuration Reference
Complete guide to all SweepTag settings and customization options.
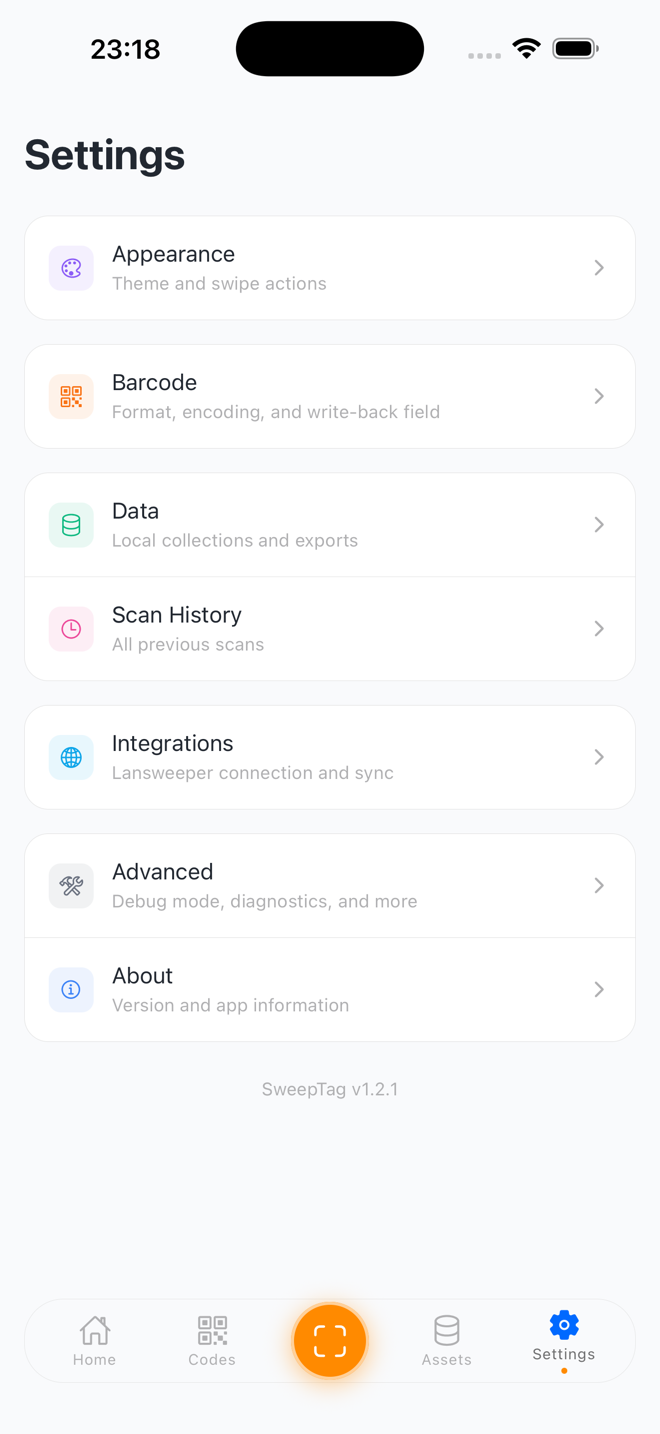
Barcode Configuration
Barcode Format
Choose how barcodes are generated.
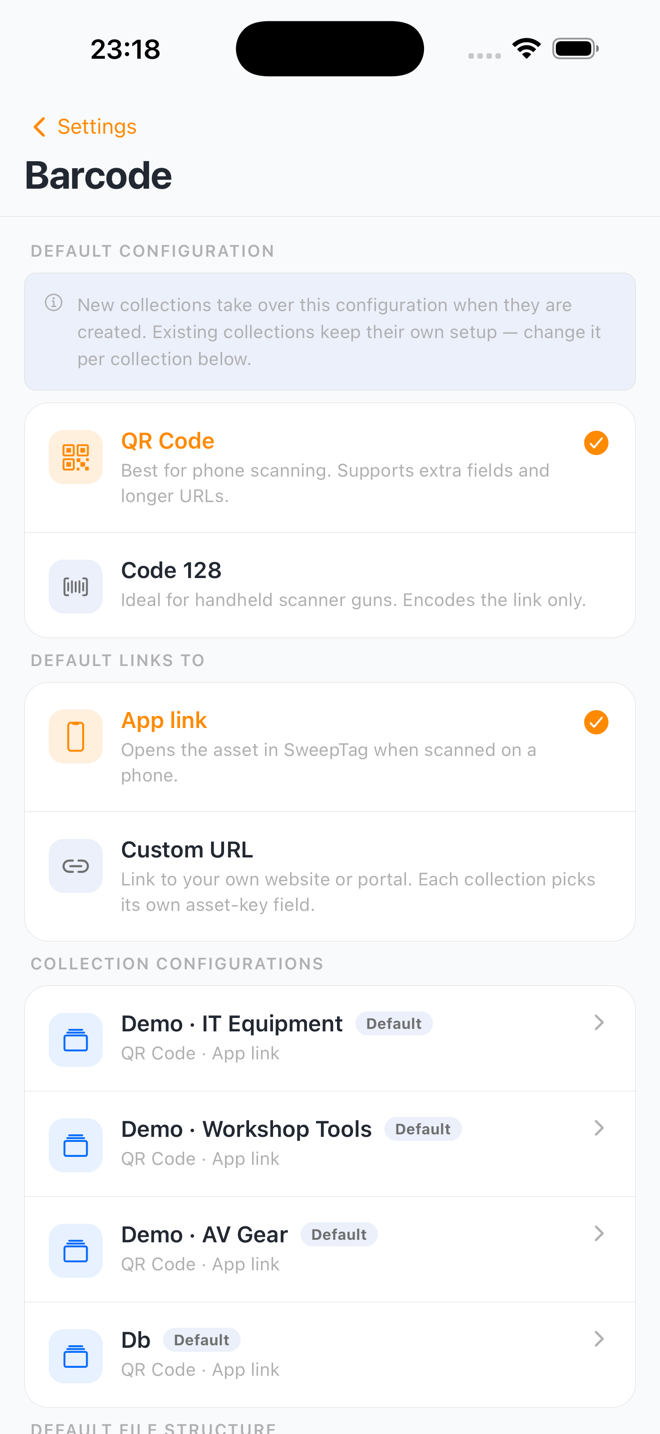
Location: Settings › Barcode › Default configuration
Options:
-
QR Code (default)
- Encodes: Full URLs, asset data, text
- Scannable: Any smartphone camera or barcode scanner
- Size: Varies by data (small to large)
- Best for: Quick linking, mobile scanning
-
Code 128
- Encodes: Numbers and basic text
- Scannable: Dedicated barcode scanners
- Size: Narrow horizontal bars
- Best for: Warehouse scanning, dense labels
Barcode Link Type
Configure what the barcode encodes when scanned.
Location: Settings › Barcode › Default links to (the app-wide default). Each collection can override it under Settings › Barcode › Collection configurations › (your collection) › Links to.
Options:
App link (Default)
- Encodes: A SweepTag link that identifies the asset
- When scanned: Opens the asset directly in SweepTag
- Use for: Internal tracking, app-based workflows
Custom URL
- Encodes: Your own URL pattern
- Template:
https://yoursite.com/assets/{assetKey} - When scanned: Opens your custom URL in browser
- Placeholder:
{assetKey}— replaced with the asset's key. If the template contains no{assetKey},?assetKey=…is appended automatically. - Asset key field: in the collection's barcode setup, the Asset key section chooses which field supplies the key — the asset's id (default), or any field such as a serial number or asset tag.
- Example:
https://inventory.company.com/lookup?id={assetKey} - Use for: Custom systems, external tools, web dashboards
Lansweeper assets have a third choice, Lansweeper web, which opens the asset's page on app.lansweeper.com in a browser — see Link Type for Lansweeper.
Encoding a field value: there is no separate "field value" link type. To put a serial number, SKU, or other field into the barcode, pick that field as the Asset key in Custom URL mode, or embed it with Fields in the QR Code.
Fields in the QR Code
QR codes can additionally embed selected field values as URL parameters, so any scanner app can read them even without SweepTag installed. (Code 128 is link-only — extra fields are skipped to keep it scannable.)
Location: Settings › Barcode › (your collection) › Fields in the QR code → Choose fields
- Opens a searchable picker listing every field in the collection — shared fields and fields that only apply to a specific asset type.
- Tap to select any number of fields; selected fields appear as chips you can remove.
- On a type-specific field, the value is only embedded for assets of that type.
File Format
Choose the image format for generated barcodes.
Location: Settings › Barcode › Default file structure
Options:
-
PNG (default)
- Format: Lossless image
- Size: Larger file size
- Quality: Perfect for printing
- Transparency: Supported
- Best for: General use, printing
-
JPEG
- Note: JPEG exports are currently written as PNG files — SweepTag has no JPEG encoder, so choosing JPEG produces a
.png - Warning: JPEG compression can blur barcode edges, which is why the export falls back to lossless PNG
- Best for: choose PNG or SVG instead for scannable barcodes
- Note: JPEG exports are currently written as PNG files — SweepTag has no JPEG encoder, so choosing JPEG produces a
-
SVG
- Format: Vector graphics (scalable)
- Size: Smallest file size
- Quality: Perfect at any scale
- Scalable: Infinitely without quality loss
- Best for: Professional printing, large formats
-
PDF
- Format: Document format
- Size: Includes metadata
- Printable: Direct from PDF readers
- Best for: Bulk printing, archival
Note: PDF barcodes are rendered as vector graphics (no raster compression), so they stay crisp and scan-safe at any size. PNG and SVG are also scan-safe; JPEG is not offered as a real output (see the JPEG note above).
File Structure
Control how generated barcodes are organized into a virtual file system.
Location: Settings › Barcode › Default file structure (app-wide), or Settings › Barcode › your collection for a per-collection setup
File Naming
Configure how barcode filenames are constructed. File names are built by picking parts in order under Name from — a live preview of the resulting name shows underneath.
Parts you can include:
- Fields marked required or unique identifier — only these fields are offered, so file names stay present and identifying. The Name field is a unique identifier by default; a serial number or asset tag field qualifies once you mark it as a unique identifier.
- Asset id: the asset's unique identifier
- Collection: the name of the collection
Other fields can't be picked for naming. An empty value is simply skipped when the name is built; if a file would be left with no name at all, SweepTag falls back to the first field that has a value, then to the asset's id. With nothing selected, the picker shows "No fields selected — a default name is used."
Example naming:
- Simple: Name →
ThinkPad X1.png - With id: Name + Asset id →
ThinkPad X1_asset-12345.png - With serial: Name + a unique Serial number field →
ThinkPad X1_SN12345.png
To configure:
- Go to Settings › Barcode and tap your collection. (The app-wide default under Default file structure offers only the collection-independent parts — Asset id and Collection.)
- Under Name from, tap parts under Add to append them in order; tap a selected chip to remove it
- Choose the Separator between parts:
_(underscore),–(dash), or␣(space) - Tap Save barcode setup
Folder Organization
Control how barcodes are grouped into folders.
Location: Settings › Barcode › Default file structure › Folders (flat or by format app-wide); grouping by asset type or by a field is chosen per collection under Settings › Barcode › your collection
Options:
Flat (Default)
- No folder grouping
- All barcodes in root
- Use for: Simple collections, fewer than 100 items
By Format
- Separate folders:
QR Code/andCode 128/ - Groups by barcode type
- Use for: Workflows that generate both formats
By Asset Type
- Separate folders for each asset type
- Example:
Servers/,Workstations/,Printers/ - Use for: Large inventories with multiple types
- Lansweeper: Default setting (Lansweeper has asset type field)
- Local collections: Groups by each asset's type — e.g.,
Computer/,Monitor/(see Asset Types)
By Custom Field
- Choose a custom field (e.g., "Department", "Category", "Location")
- Creates folder per field value
- Example:
Marketing/,IT/,Finance/ - Use for: Organizing by department, location, team, etc.
- Local only: Requires custom field on your assets
Image Format
Choose the image format for all generated barcodes.
(See File Format above for details on PNG, JPEG, SVG, PDF)
Lansweeper Configuration
Connection Settings
Manage your Lansweeper instance(s).
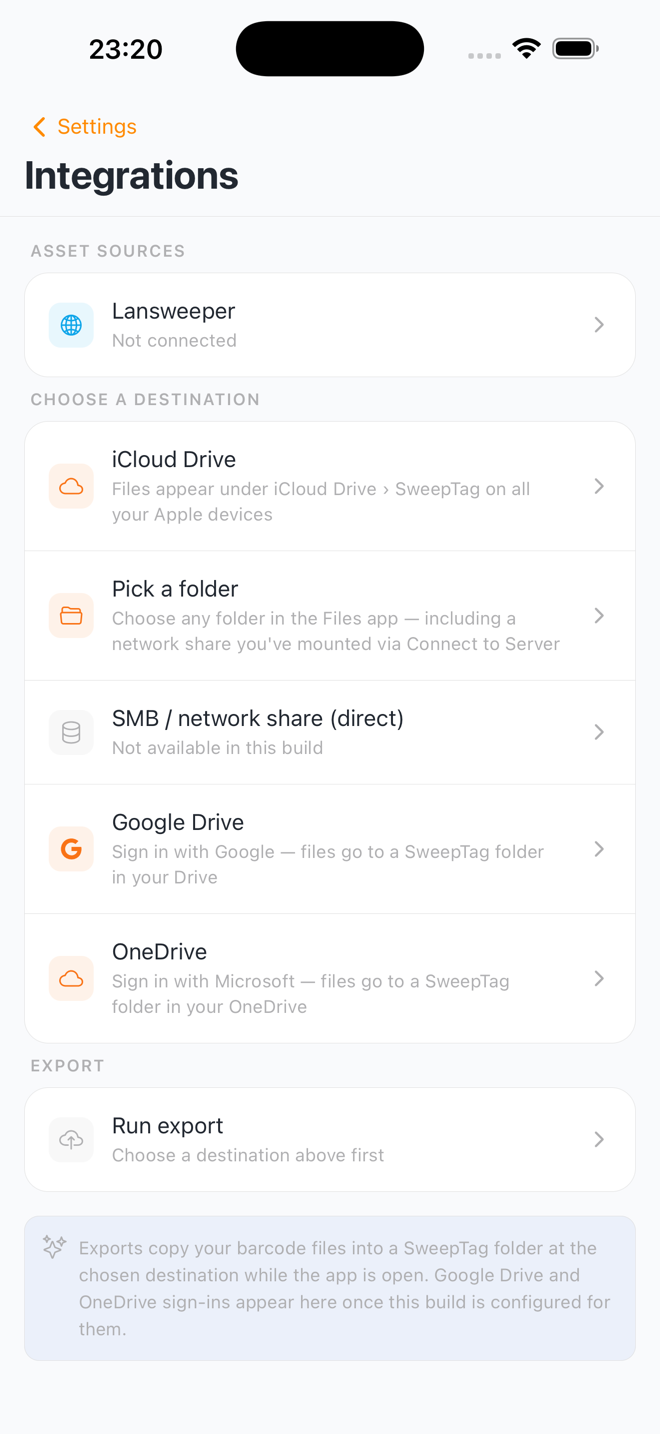
Location: Settings › Integrations › Lansweeper
Add a connection:
- Tap Add connection — a short wizard opens
- Follow the in-app instructions to create a Personal Access Token (PAT) in Lansweeper: go to app.lansweeper.com › your name initials › Account settings › Developer Tools › Add New API Client
- Name the connection and paste your PAT, then tap Continue
- SweepTag discovers your sites automatically — pick the ones you want
There is no API URL to enter — the PAT is all SweepTag needs.
Multiple connections:
- You can add multiple Lansweeper instances
- Each uses its own PAT
- Useful for: Different regions, staging vs. production, multi-tenant
Remove a connection:
- Tap the trash icon on the connection card
- Choose Keep local data or Delete local data — the latter also removes the barcodes and cached assets stored on the device for those sites
Custom Field Configuration
Configure how barcode values are written back to Lansweeper.
Location: Settings › Integrations › Lansweeper › Create custom field
Create a custom field:
- Tap Create custom field
- Name it (e.g., "Barcode ID")
- Select the site(s) to create the field on — pick one or more
- Tap Create; per-site results show Created, Already exists, or Failed
- The field becomes writeable for barcode values on the sites where it was created
Use cases:
- Store barcode values in Lansweeper for auditing
- Track which barcodes are assigned to which assets
- Link Lansweeper records to external barcode systems
Barcode Format for Lansweeper
Same as Barcode Format above (QR, Code 128).
Location: Settings › Integrations › Lansweeper › Barcode Format
Link Type for Lansweeper
Similar to Barcode Link Type above, with one extra option.
Location: Settings › Integrations › Lansweeper › "Barcodes link to"
Available options for Lansweeper:
- App link — opens the asset in SweepTag when scanned on a phone
- Lansweeper web — opens the asset's page on app.lansweeper.com in a browser, no app needed
- Custom URL — your own URL with the
{assetKey}placeholder; without it,?assetKey=…is appended automatically
Your choice applies as soon as you tap it — there is no separate save step.
Print Settings
Defaults for every label you print or share.
Location: Settings › Printing
Default Print Size
Set your default label size.
Location: Settings › Printing › Label size
Options:
-
Small: 48 × 30 mm (2" × 1.2")
- Efficient use of label sheets
- Fits on smaller items
-
Medium: 70 × 45 mm (2.8" × 1.8")
- Standard asset labels
- Default for most use cases
-
Large: 100 × 60 mm (3.9" × 2.4")
- Large items, warehouses
- Easy to scan
- Easy to read
The printed page size follows the label size — there is no separate paper-size setting.
Default Print Content
Choose what appears on printed labels besides the barcode itself. Each is a toggle you can turn on or off; with everything off, the label shows just the barcode.
Location: Settings › Printing
| Toggle | Adds to the label |
|---|---|
| Asset name | The asset or scan name |
| Barcode value | The encoded value as text |
| Collection / site | Which collection or site it belongs to |
| Field values | The asset's field values (local assets) |
| Print date | Today's date on the label |
Cache & Sync
Cache Refresh Interval
Control how often cached Lansweeper data is refreshed.
Location: Settings › Integrations › Lansweeper › Asset cache › Refresh after (shown once a Lansweeper connection exists)
Options:
- 1 hour - Updates very frequently
- 6 hours
- 12 hours
- 24 hours (default)
- 72 hours - Minimize network traffic
Your choice applies as soon as you tap it. Cached lists are re-fetched automatically once they are older than this window, or when you pull to refresh.
Use cases:
- 1–6 hours: Rapidly changing assets (testing, rapid deployments)
- 24 hours: Balanced (most users)
- 72 hours: Stable environments, minimize network traffic
Clear Cache
There is no separate "Clear Cache" button — cached Lansweeper data is managed for you:
- Cached lists expire on their own per the Refresh after window above, and pull-to-refresh fetches fresh data at any time.
- To remove cached Lansweeper data from the device, remove the connection (trash icon on the connection card) and choose Delete local data — this deletes the barcodes and cached assets stored for those sites.
Local collection assets, barcodes, scan history, and settings are never touched by cache expiry.
Appearance & Theme
Theme Selection
Choose the app's visual appearance.
Location: Settings › Appearance › Theme
Options:
- Light - Bright white background, dark text
- Dark - Dark background, light text
- System - Follows device's system theme preference
Formats
How dates and prices are displayed. Formats sits next to Appearance on the Settings tab.
Date Format
Choose how dates are displayed throughout the app — on asset forms, detail pages, and lists.
Location: Settings › Formats › Date format
Options:
- ISO (2024-11-30) (default) —
2024-11-30 - Day/Month/Year —
30/11/2024 - Month/Day/Year —
11/30/2024 - Long (30 Nov 2024) —
30 Nov 2024
Typing dates: you can type a date in any common order — your chosen format settles ambiguous ones (is 03/04 the 3rd of April or the 4th of March?). Dates are stored in one standard form, so switching the format later re-displays every existing date correctly.
Default Currency
Choose the currency used for price fields (fields used as a purchase price).
Location: Settings › Formats › Default currency
Options: Euro (EUR, the default), US Dollar (USD), British Pound (GBP), Swiss Franc (CHF), Japanese Yen (JPY), Canadian Dollar (CAD), Australian Dollar (AUD), Swedish Krona (SEK), Norwegian Krone (NOK), Danish Krone (DKK), Polish Złoty (PLN), and Indian Rupee (INR).
- New price fields start with the default currency; each price field on an asset form also has its own currency chip, so a single asset can hold prices in different currencies.
- Asset details show the price with its symbol — e.g. €1,000.
Swipe Actions
Configure what happens when you swipe left or right on an asset in the list.
Location: Settings › Appearance › Asset swipe actions
Swipe right: the action revealed on the left when you drag a row right Swipe left: the action revealed on the right when you drag a row left
Available actions:
- Delete - Remove asset (with confirmation)
- Edit - Open asset for editing
- Barcode - Generate a barcode for the asset
- None - Turn that swipe direction off
Note: On Lansweeper assets, "Delete" removes the barcode and "Edit" generates one, since Lansweeper assets can't be changed from the app.
Advanced Settings
Debug Mode
Reveals the activity log for troubleshooting.
Location: Settings › Advanced › Debug mode
Important: activity is recorded whether or not debug mode is on. The toggle only controls whether the log is shown. If something already went wrong, turn debug mode on afterwards — the history is still there.
Use when:
- An export or file-share connection fails
- Troubleshooting a Lansweeper connection
- Reporting a problem to support
Activity log
Appears under Settings › Advanced once debug mode is on.
What gets recorded:
| Source | Covers |
|---|---|
EXPORT | Each export run: destination, plan (new / changed / removed / unchanged), per-file failures, final result |
FILES | Picking and opening a destination — folder and SMB grants, iCloud availability, permission problems |
CLOUD | Every Google Drive and OneDrive request, with the provider's own error text |
AUTH | Sign-in and token refresh for Google Drive and OneDrive |
API | Lansweeper GraphQL calls |
DIAG | Output of the Diagnostics button |
Finding things:
- Search matches the message, source, and detail text
- Level chips narrow to INFO / DEBUG / WARN / ERROR
- Source chips narrow to one source (only sources that have logged appear)
- Tap a row with a chevron to expand its detail
Actions:
- Diagnostics — runs connectivity checks against Lansweeper and logs the results
- Copy — copies the entries currently on screen, oldest first, ready to paste into a support message. Filters apply, so you can send just the export failures.
- Clear — empties the log
Retention: 7 days, up to 2 000 entries, stored on the device only.
Privacy: passwords, access tokens, refresh tokens, and personal access tokens are stripped before anything is written to the log, so a copied log is safe to share. See Data & Privacy.
Demo Data
Try SweepTag with ready-made sample collections — no need to enter your own data first.
Location: Settings › Advanced › Demo data
Options:
- Add sample data — adds five demo collections filled with example assets (IT equipment, workshop tools, AV gear, furniture, facilities). Their names all start with "Demo · " so they're easy to spot.
- Remove sample data — deletes every "Demo · " collection and its assets. Your own collections are untouched.
Use when: you want to explore features — asset types, filters, barcodes, printing, export — with realistic data before adding your own.
Local Collection Settings
Everything about a collection is managed from Settings › Data: tap the collection to open its action sheet — Edit data model, Export CSV, Export JSON, Import CSV / JSON, Delete collection. (The circled ? in the screen header opens the matching knowledge-base article.)
Collection Name
Change the name of your local collection.
Location: Settings › Data › (your collection) › Edit data model › change the name on the first step, then Save collection
Collection Template
Starter kits (templates) only pre-fill the field set when a collection is created — the choice isn't stored or shown afterwards. Every field a template added can be changed later via Edit data model.
Asset Types
Manage which asset types the collection contains and which extra fields each type adds.
Location: Settings › Data › (your collection) › Edit data model › the types section (New type / From library)
Also here:
- Quick capture type — the type automatically assigned to assets created by scanning
- "Used as" — set on any field to tell SweepTag what the field is used as (serial number, warranty expiry, …)
See Asset Types for the full guide.
Export Collection
Export all assets as CSV or JSON.
Location: Settings › Data › (your collection) › Export CSV or Export JSON
Formats:
- CSV - Open in Excel, Google Sheets
- JSON - For data migration, backups
Delete Collection
Permanently remove a local collection.
Location: Settings › Data › (your collection) › Delete collection
Warning: This cannot be undone. All assets and barcodes are deleted.
App-Wide Settings
About
View app version and information. (SweepTag is English-only — there is no language setting.)
Location: Settings › About
Shows:
- Version — the app version number
- Platform — iOS or Android
- Framework — Expo SDK 54
- Created by — Sweepfull, with a link to sweepfull.eu
- What SweepTag does — the feature list
- Knowledge base — link to the online guides and FAQs
Contact Us
Get in touch with the SweepTag team.
Location: Settings › Contact us
Shows:
- Knowledge base — link to the online guides and FAQs
- Email support — opens your mail app with a new message to support@sweepfull.eu, pre-filled with a SweepTag subject line and the app version
Default vs. Per-Item Configuration
Barcode settings have two levels:
App-Wide Default
- Set once in Settings › Barcode (Default configuration, Default links to, Default file structure)
- New collections inherit it
- Example: Default barcode format = QR Code
Per-Collection Override
- Override the default for one collection: Settings › Barcode › Collection configurations › (your collection)
- Takes precedence over the app default for every asset in that collection
- Example: One collection uses Code 128 while the default stays QR Code
There is no per-asset override — all barcodes in a collection share its format and link type, and standalone codes (Codes tab) are always QR.
Workflow:
- Set app-wide default in Settings (saves time)
- Override per collection when needed (flexibility)
Configuration Examples
Example 1: Warehouse Inventory (High-Volume Scanning)
Recommended Settings:
- Barcode Format: Code 128 (faster scanning)
- Folders: By Location (organize by warehouse section)
- File Naming: Name + Asset id
- Label size: Large (easy to scan in warehouse)
- Print content: Asset name on
- Cache Refresh: 72 hours (stable inventory)
Example 2: IT Asset Management (Lansweeper)
Recommended Settings:
- Barcode Format: QR Code (smartphone-friendly)
- Link Type: Lansweeper web (direct to system)
- Folders: By Asset Type (Servers, Workstations, Printers)
- File Naming: Asset name + Asset type (Lansweeper file names use Asset name / Asset type / Site / Date — serial number is not available for Lansweeper trees)
- Label size: Medium (standard labels)
- Print content: Asset name on
- Cache Refresh: 24 hours (the default — automatic refresh)
Example 3: Tool Library (Small Collection)
Recommended Settings:
- Barcode Format: QR Code (smartphone check-out)
- Folders: Flat or By Category
- File Naming: Tool Name
- Label size: Small (efficient sheets)
- Print content: all toggles off (barcode only)
- Swipe Actions: Right = Barcode, Left = Edit
Example 4: Quick Barcode Generation (Hobbyist)
Recommended Settings:
- Barcode Format: QR Code (versatile)
- Link Type: Custom URL (to your site)
- File Format: SVG (scalable)
- Label size: Small (space-efficient)
- Print content: all toggles off (barcode only)
Reset App
Completely erase everything and start over from the setup wizard.
Location: Settings › Advanced › Reset › Reset app
What's erased (everything on the device):
- Every local collection and all of its assets
- All generated barcodes and barcode history
- Scan history
- Lansweeper connections
- Every setting (barcode, print, file structure, theme, swipe actions, cache preferences)
What happens next: the app returns to the Welcome screen so you can set it up fresh (see Getting Started).
Double confirmation (so it can't happen by accident):
- A warning explains that all data will be permanently deleted.
- You must type
deleteto enable the final Reset app button.
Warning: This cannot be undone. Export anything you want to keep first (see Data, Privacy & Reset). Only SweepTag's own data is removed — nothing else on your device is touched.
Use when:
- You want a genuinely clean slate
- Handing the device to someone else
- Troubleshooting a deeply confused state
Saving Configuration as Template
(Planned feature)
In a future update, you'll be able to save your configuration as a template and share it with team members or use it across devices.